Occasionally I find myself collaborating with other studios by sharing files and projects back and forth. I recently had the pleasure of contributing some vocal and instrument tracks to an album by an Artist from my hometown in upstate NY. There is almost always some trial and error involved in the process of transferring – especially if working in different DAWS. In these strange days of distance and isolation, collaboration across time, space and DAWs is becoming more common.
Collaborating Solo…
So I decided to play the part of not two but three different studios and record a song in three different DAWs by myself just to go through the process and the pain. The key was transferring the audio as Broadcast Wave Format (BWF) files so they would remain time-aligned in each DAW. That sounds simple, but every DAW has its quirks and each have different options for import and export. I went through the process in both directions between Pro Tools and Cakewalk and between Pro Tools and Reaper.
I captured the process in a couple of videos (see below), but if you want the short text version, here is the chronology of what I did:
- Recorded a guitar in Pro Tools
- Exported that
- Imported that into Cakewalk
- Recorded another guitar in Cakewalk
- Recorded a mandolin in Cakewalk
- Exported those
- Imported those into Pro Tools
- Exported a mix of everything from Pro Tools
- Imported that mix into Reaper
- Recorded a shaker track in Reaper
- Exported that
- Imported that into Pro Tools
- Recorded a whole bunch of other stuff in Pro Tools
- Mix
- Listen
For reference, Part I of the video has steps 1-8. Part 2 has the rest.
The Settings
I’m sure that most modern DAWs offer some way to do what I did. I happen to have licenses for Pro Tools, Cakewalk and Reaper so those are the ones I used. Following are some details of how to set this stuff up.
Pro Tools
One good thing about Pro Tools is that as long as you set BWF as the format for your session (it is by default), everything will be done as BWF.
The first thing that bites you about pro tools is that their idea of “Time 0” is – by default – One Hour. This is not unusual among video editing applications as it allows for “Preroll”. The problem is that if you leave your session set with a one hour offset, anything you export to another daw will end up one hour down the timeline. Fortunately, this is easy to change. But first, I would suggest you Turn ON the Timecode Ruler.

Having this on makes is very easy to see what the smpte time offset of your session is. And you can see that the default session start of 01:00:00:00 is reflected in the ruler. To get to this Session Setup dialog, go to Setup|Session in the main menu.
Change that Session Start to 00:00:00:00. Once you do that, zero will be zero everywhere.

Pro Tools Importing
When importing into Pro Tools, you might hope that drag/droping a file on the timeline would automagically align it to the BWF Timestamp. That would be nice, but it doesn’t happen. The clip lands whereever you drop it and you need to Spot it to the BWF Time. To do that, right-click the clip and choose Spot.

The Spot dialog shows where the clip is now as well as the BWF Time (Original Time Stamp). Note that you can display these in any time format you like (even raw samples). The little widget next to the Original Timestamp will set the actual start time to the BWF time. Click OK an your clip will fly to the right time.
Pro Tools Export
Pro Tools has the simplest Export Dialog of all the DAWs I worked with. Instead of having a source category picker like other DAWs, you either use the Bounce… menu choice from the Track Menu (which will render separate files per track), or the Bounce To Disk… menu choice from the File menu which renders a mix to one track. Personally, I found this a bit confusing and it would have been clearer to have one Export Menu with some widgets to control the behavior explicitly. In both cases, BWF Timestamps are always written.

For bouncing raw clips to import into another DAW, I normally uncheck vol and pan automation. That way the dood on the other side can mix the stems anyway they want.
Cakewalk
Ahhh Cakewalk! Cakewalk as the name implies makes this all very easy once you adjust a few settings.

The most important thing is that you check Always Import Broadcast Waves at Their Timestamp and Export Broadcast Waves by Default. I don’t think these are checked by default which is too bad. With these options checked, Import/Export of BWFs is very easy. If you drop a BWF clip on the timeline, it will instantly fly to the ritght location. No extra Spot step required like in Pro Tools (and Reaper).
Cakewalk Exporting
Cakewalk has a very versatile export dialog. It has enough settings to do anything you need but it’s not overwhelming. And it even has presets!

Here again, when exporting individual clips, you can choose the Clips source category. The key thing is to render as BWF to preserve the timing! I normally disable all automation in this case. I would render track effects if I had some plugin that was crucial to the content (like a sync’d delay or something).
Reaper
This is the DAW I am least familiar with. I did buy a licence for it just for cases where I need to work with these projects. That said, I would preface everything I say here with “as far as I know”. I’ve spent the least amount of time learning this app.
Importing into Reaper
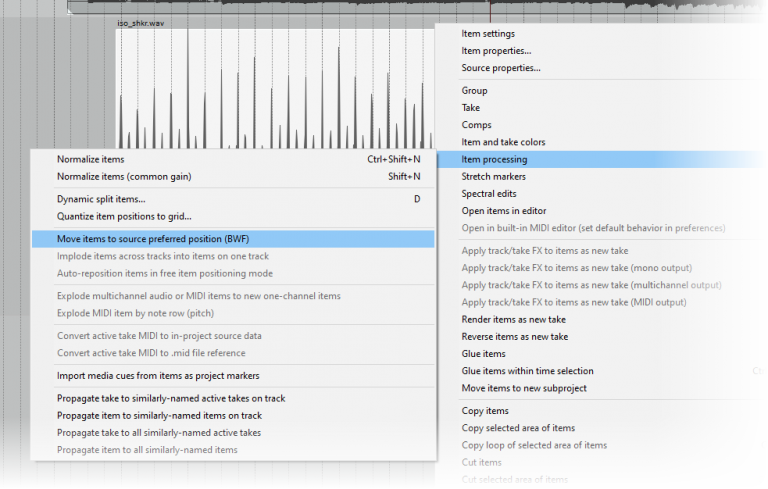
Like Pro Tools, it seems that Clips must be moved to their BWF timestamp after they are dropped onto the timeline. To do this, you go to the Items menu (either right click or main menu) and choose Item Processing|Move items to source preferred position (BWF).
Click that and the clips fly to the right place. It’s similar to Spot in pro tools.
Exporting from Reaper
Reaper’s export dialog, like Cakewalk’s is very comprehensive.

Like Cakewalk, it is a single Dialog box with a Source Category and lots of controls that affect the behavior. Again, for our purpose here having Write BWF (bext) chunk checked is the most important thing to preserve the timing.
That about covers the settings for import/export to be aware of in these three DAWs.
Isolate, The Making Of
Here are the videos. I wanted to actually go through the process on a real tune. Although all the tracks were recorded in one studio, I went through all the steps (except for transferring files over the internet) that would happen if this was recorded in three different countries. There was a lot of time spent here on trial and error. You’re seeing a very edited down version of the process.
Hope they are helpful. Please don’t like, subscribe or comment (using reverse phychology here)
The Final Track (Audio Only) can be heard here
Robert’s Reason · Isolate